what microsoft program to use to make a thank you card
Microsoft Word can do a lot more beyond the blandness of making reports and resumes. Information technology has a capable set of graphic tools to help you lot make graphic enriched documents like greeting cards. You can as well plow to Word and create a greeting card for all occasions with your kids. Children won't get bogged downwardly in the features different a desktop publishing tool or a graphic editor.
In this Word tutorial, nosotros'll create a greeting card from scratch to prove how easy it tin can be for anyone.
How to Create a Greeting Card with Microsoft Word
Before y'all sit downward to blueprint a greeting bill of fare in Word, you have to make up one's mind whether you want it to be flat like a postcard or a folded card like a Hallmark carte du jour. Greeting cards also come up in all shapes and sizes from A0 (84.1 x 118.9 cm) to A10 (2.vi x 3.seven cm). These choices will dictate every other pattern decision that follows.

ane. Open a Blank Document
Open Microsoft Word and select a bare document. Utilize this blank canvas to add together your own ideas on what a greeting card can be. You tin add photos, shapes, text, Word Fine art, and even 3D models.
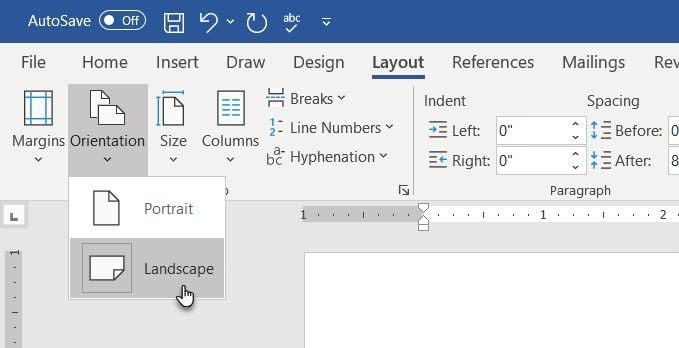
2. Set Orientation and Layout
Greeting cards are usually laid out in mural. Landscape mode works better with images too.
To change the layout from portrait to landscape, go to Ribbon > Layout > Folio Setup Grouping > Orientation > Landscape.
Select Size in the Page Layout Group to choose one of the standard sizes from the dropdown. You can likewise use a custom size by going to Paper Size at the bottom of the drib-down menu.
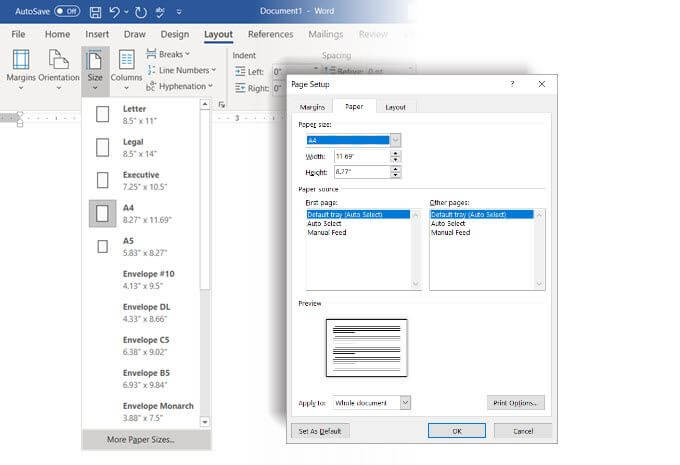
Tip: Use the Margins tab on the Page Setup dialog to reduce the margins if yous want the image to cover the paper.
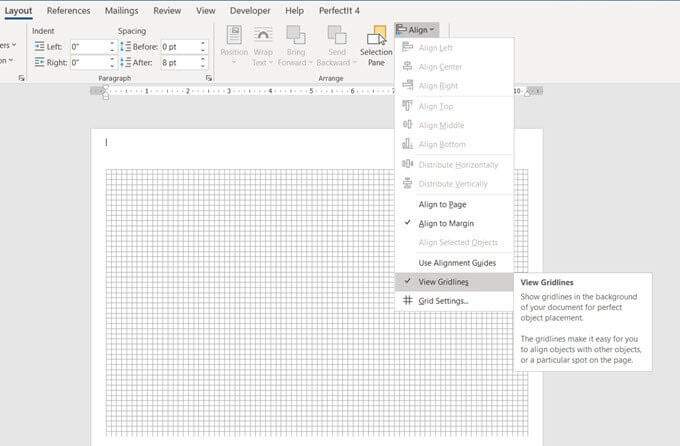
three. Balance Everything with Gridlines
You don't demand to stuff your document. White infinite helps to balance text with graphics. Enable Gridlines and Alignment Guides to align objects on the document with precision. Gridlines are not printed. You can also decide non to use gridlines and instead align everything with your eye.
Become to View > Gridlines.
Select your graphic in the document. Go to the Format tab on the right of the ribbon. For a selected shape, the tab will read Shape Format.
Select Align > Filigree Settings.
Use the settings to enable the Snap-to feature, display alignment guides, and alter the distance between gridlines.
As this Microsoft Word support article says, the Snap To feature only works in Impress view.
four. Split up Your Folio for the Fold
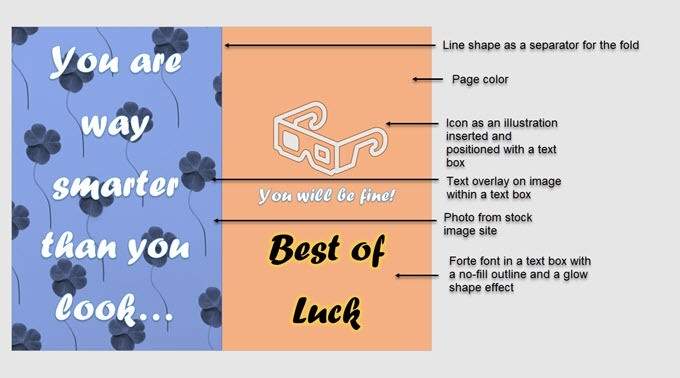
For greeting cards that fold downward the middle, you lot can divide the page in half. There are different ways to practise it Word. For our tutorial, we volition use the line shape and identify information technology in the center of the page.
Become to Insert > Shapes > Line. Press the Shift key and describe a vertical line across the middle of the folio.
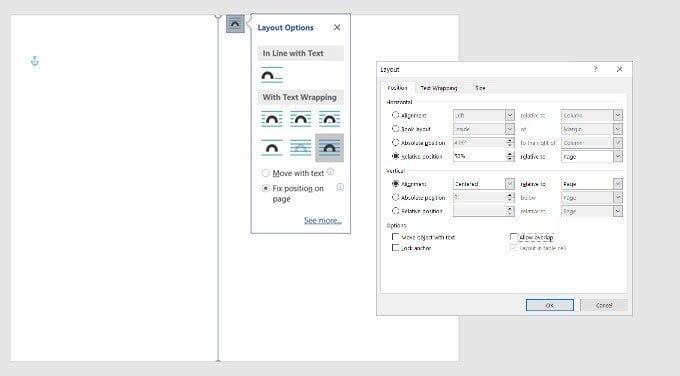
Whatever new content on the page can nudge this separator. To proceed it exactly in the centre, select the Layout Options icon that is suspended above the selected line.
Select Fix position on page. Then, Select See more than.
In the Layout settings, fix the position of the line shape by setting the Horizontal and Vertical alignments.
5. Outset Adding Your Graphics
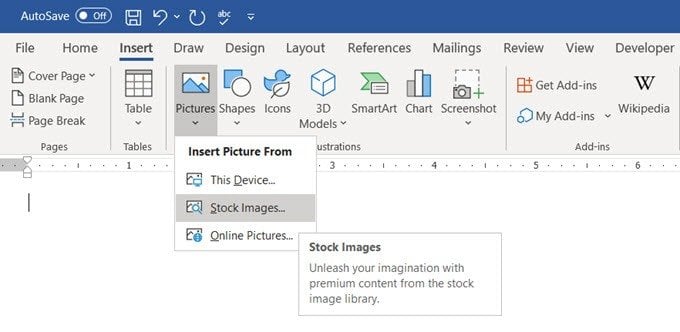
Information technology'south time to add together graphics that match the theme of the bill of fare. Use free stock photos or upload your ain to personalize the card. Select Insert > Pictures to insert a flick in your document. Microsoft Word supplies stock images, but it'south always improve to become with your ain image for a personal affect.
In this tutorial, we have used an prototype from Pexels.com.
Y'all tin can besides fill the whole page with the picture if y'all fix information technology as the groundwork. Go to Design > Page Color > Make full Effect.
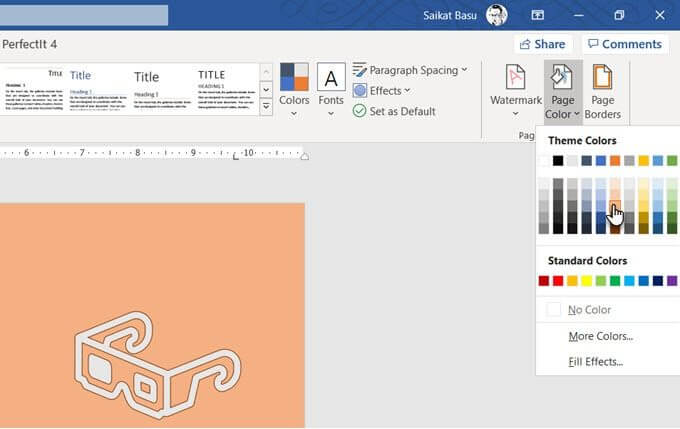
The Flick tab allows you to utilise your own photograph or any Creative Commons paradigm sourced with a Bing Search as a picture show fill up for the page. You can see the preview before you insert it in the certificate.
half-dozen. Cull Beautiful Fonts
The greeting carte du jour has its picture. Now, you take to work on the text and other content.
Go to Insert > Text Grouping. You tin can select a Text Box to enter text or choose Word Art. As at that place are several Word Art Styles available, you don't have to recollect too much about styling your text.
Alternatively, you have to piece of work with Shape Fill, Shape Outline, and Shape Effects if you opt for plain text.
All options are easily attainable from the Shape Format tab on the Ribbon and intuitive to apply.

Text options inside a Text Box in Microsoft Word come with advanced formatting. For instance, you can begin with a nice font, set the right font size, and give information technology the right font color. So select the Text Box and right click to open the context carte. Select Format Shape to display a sidebar with all the Shape and Text Options.
Text Options is farther organized into:
- Text Fill & Outline
- Text Effects
- Layout & Properties
Play effectually with fills, gradients, and transparency to decorate your text. The aesthetic combination volition besides depend on the motion picture that works every bit the groundwork for the text.
In this tutorial, we have given the text a "Glow" to heave the celebratory feel of the card.
Tip: Stick to i or 2 typefaces to brand information technology less distracting. As well, choose a typeface that reflects the mood of the event and format it with the color that best matches the background or the graphics. While yous can install creative fonts in Microsoft Word, not all of them volition print well.
7. Preview and Print
Your card is ready with its combination of pictures, colors, and text. Proof information technology on screen first and then print information technology out on inexpensive paper. Look for typos in the text and check if every chemical element is lined upwards correctly.
Pay careful attention to the margins as differences there tin affect the final layout. If you are printing a folding card, use the sample to see if the fold is at the right place and doesn't cutting across a graphic or the text.
Bring out the good quality stock paper and print your first greeting card. If you are making multiple copies, it'due south always wise to check the quality of the toner or ink afterwards a few batches.
Your Card Is Set up
Graphical features of Word might exist limited when you create a greeting card with Word, but they tin can do an adequate job.
Templates are the quicker way to become a greeting card out of Microsoft Word. But volition they give y'all the joy of making your own for someone special? Maybe you can employ the greeting card templates equally an inspiration to design your ain.
Also, try Microsoft Publisher with the help of this guide. It'southward a amend alternative to Microsoft Discussion equally information technology's meant for desktop publishing of all kinds.
Practice non share my Personal Information.
Source: https://www.online-tech-tips.com/ms-office-tips/how-to-create-a-greeting-card-with-ms-word/
0 Response to "what microsoft program to use to make a thank you card"
Postar um comentário